


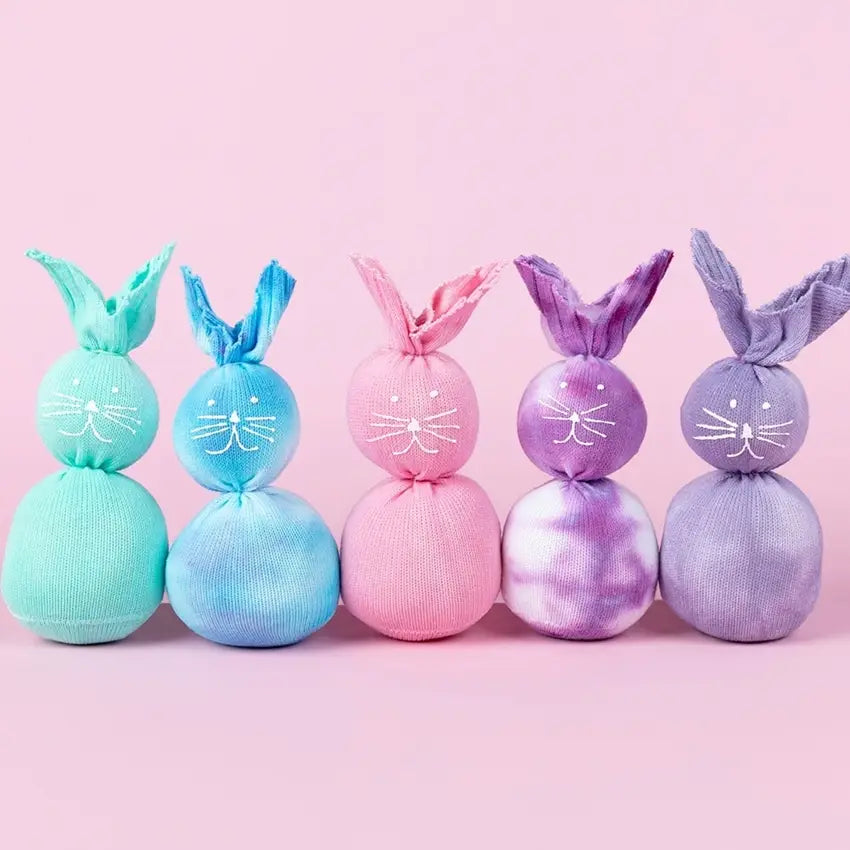
Pastel Tie-Dye Sock Bunnies
- $22.99
$22.99- $22.99
- Unit price
- per
There's a chance we're biased here (we don't think so), but aren't these sock bunnies pretty much the cutest little critters you've ever seen?! If you're looking for a spring craft to do with the kids while hanging out at home, this adorable DIY keeps on giving after the creative part with some extra snuggly playtime fun. So grab some old socks you already have (or order a cheap pack online), your favorite Tulip One-Step Tie-Dye Kit, and check out this easy tutorial for making sweet little sock bunnies for spring.
What you need:
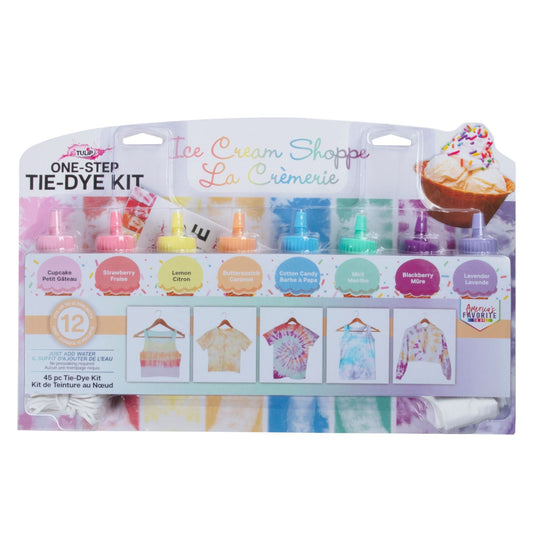
- Tulip One-Step Tie-Dye Kit - Pretty Pastels or kit of choice
- Tulip Dimensional Fabric Paint
- White 100% cotton socks
- Embroidery string - matching colors
- Disposable plastic cups
- Polyfil stuffing
- Scissors
- Disposable plastic surface cover

Step 1 Add Water to Dyes
Add water to each of the dye bottles you'll be using, replace caps and shake to mix.

Step 2 Pour Dye Colors into Cups
Once dyes are mixed, pour each color into its own disposable cup.

Step 3 Dampen Socks
If your socks are brand new, you'll want to wash them before dyeing (without fabric softener). Either way, make sure your socks are damp before dyeing.

Step 4 Dip Socks into Dyes
Crumple up your socks and place one into each dye color.

Step 5 Wring Out Dye from Socks
Once the socks have soaked in the dye for a while, wearing gloves, wring out the socks and place on a plastic-covered surface.

Step 6 Let Dye Set
Cover the socks with plastic and let set overnight for the dye to fully process.

Step 7 Fill Socks with Polyfil
Once the socks have finished processing, rinse thoroughly and wash and dry according to dye instructions. Stuff each sock with Polyfil.

Step 8 Tie String Around Sock to Create Bunny
Tie a strand of embroidery string tightly around the halfway point of each sock to create the body and the head. Tie another just above the "head" at the base of the leg portion of the sock to create the section for ears.

Step 9 Cut Tops to Create "Ears"
Cut top portion of socks in a V shape to create ears.

Step 10 Add Paint to Create Faces
Use white Dimensional Paint to create a face and whiskers on each bunny sock.

Step 11 Let Paint Dry
Let bunny socks dry flat for several hours until paint has completely dried.