


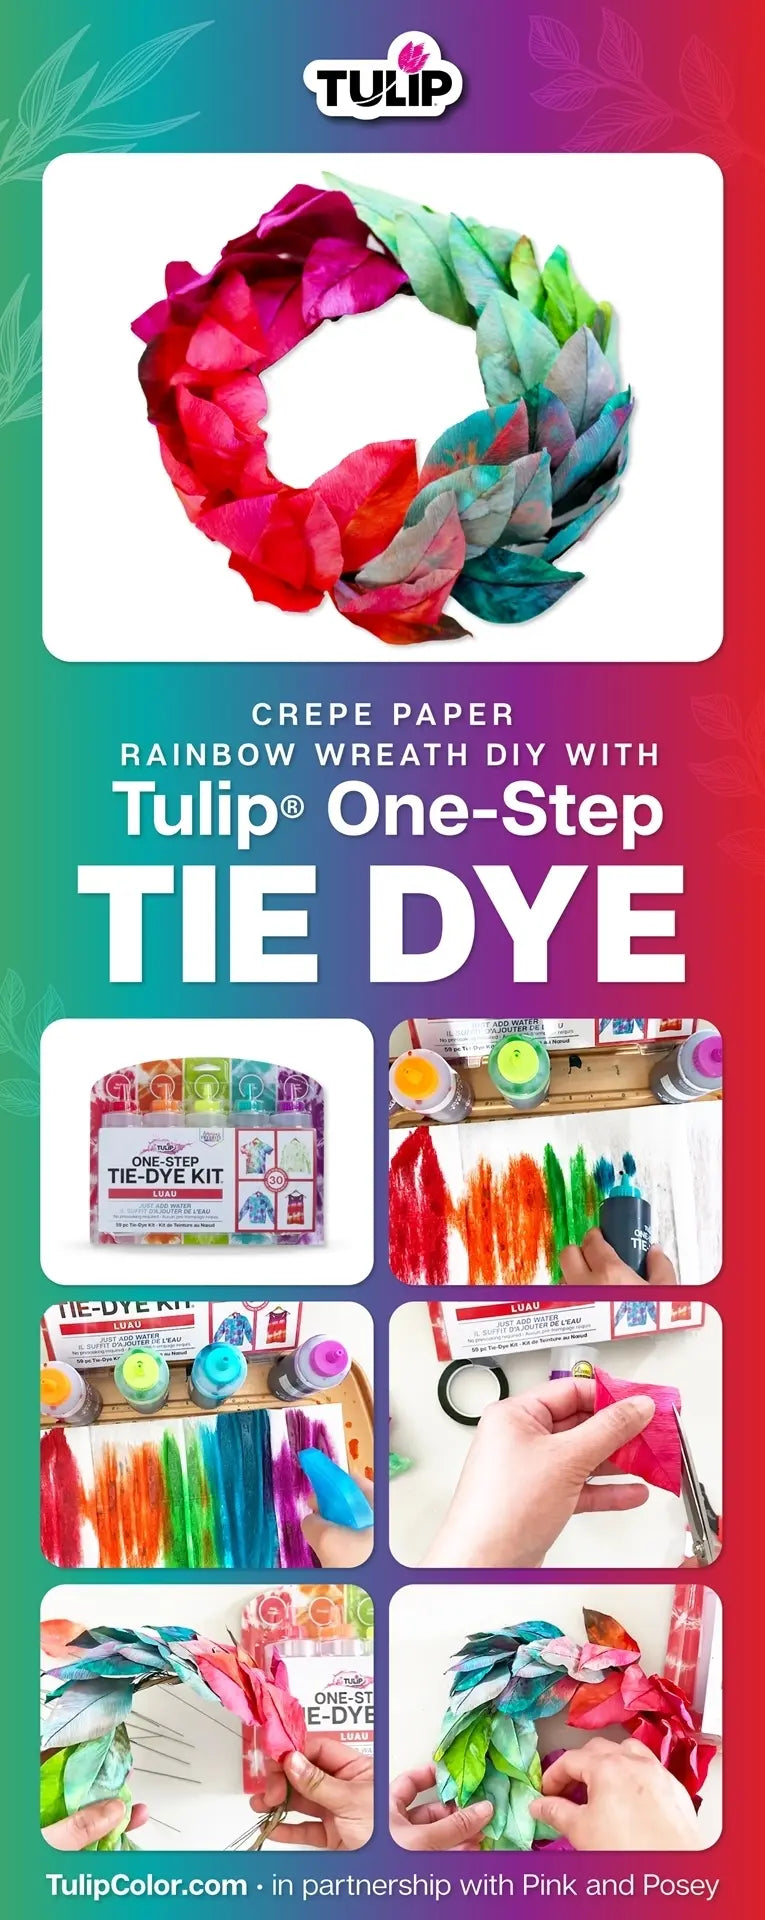
Rainbow Wreath Tie Dye Project for the Home

Tie dye isn’t just for clothing … did you know you can use it on paper too? In this tutorial, Pink and Posey will show you how to use Tulip One-Step Tie Dye on crepe paper to make your own rainbow wreath. It’s a tie-dye project for the home that’ll add extra summery cheer where ever you choose to hang it!
What you need:
- Tulip One-Step Tie-Dye Kit of choice
- German doublette crepe paper – white
- Green floral tape
- 18-Gauge Kraft-covered wire
- 24-Gauge floral wire
- Aleene’s® Clear Gel Tacky Glue
- Spray bottle filled with water
- Tray
- Scissors
- Skewer

To get started on this project for the home, place the crepe paper on a tray (avoid stretching it out) and spritz it with a spray bottle filled with water to dampen it. Mix your dyes according to the instructions, then begin applying dye to the damp crepe paper.

Pink and Posey applied her dyes in rainbow order. You can experiment and apply yours however you like, just keep in mind how the colors will look when they blend together. (You’ll want to place them next to other colors they blend nicely with, instead of creating brown or muddy-looking colors.)

Spritz the paper with more water as you go along, and continue adding dyes and misting with water to help the dyes run and blend. Once your paper is entirely covered, set out in the sun to dry completely. Remember not to stretch the paper – it’s supposed to be crumpled!

Cut the crepe paper into 2.5” wide strips with the wrinkly lines, or along the grain, running across that shorter length. Like a party streamer! Then fold the strip in half widthwise. Keep folding in half until you are left with a rectangle bundle that is about 3” long. Cut all of the folds on both sides to make lots of individual squares.

To make the leaves, cut a square diagonally, corner to corner.
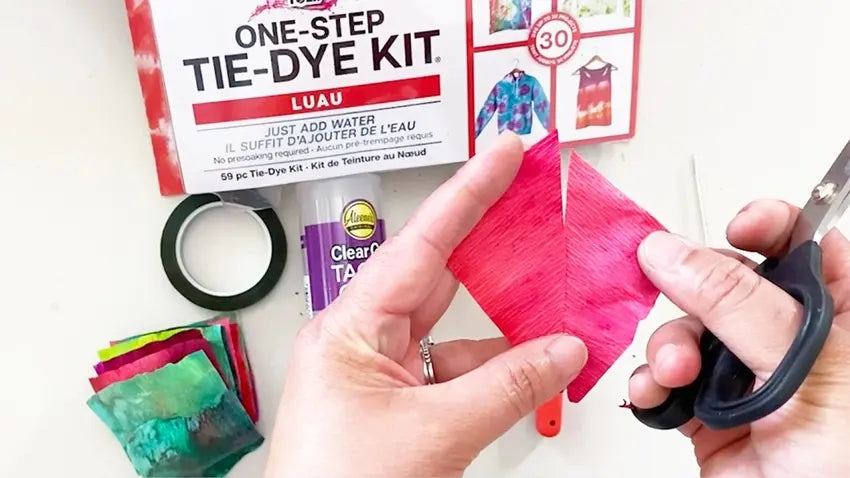
Then flip one half over and align with the other along the cut edges to make a kite shape. The grains should run downward and away from the center line.

Run a line of Clear Gel Tacky along one of the center edges.

Press the other half in place on top of the first, aligning all edges.

Open the kite shape again, with the glued edges facing downward. Crease it so it stays open.

Trim the outside of the kite shape to make it leaf shaped by rounding off the edges and cleaning up the pointed tip.

Cut a 24-gauge wire in half.

Run a line of Clear Gel Tacky along the underside of the leaf, on one side of the flap. Press the wire into the glue and fold the flap over to secure it. The wire should sit snug against the middle line of the leaf.

Use a skewer to help curl the edges of the leaf back to create dimension. Then gently stretch the middle of the leaf to help give it a cupped shape, and press a wire or other narrow tool along the side of the wire without the seam. This will make it look more like a real vein in a leaf. Repeat this process to create all leaves for the wreath.

After all leaves with wires have been created, it’s time to start putting this project for the home all together! Arrange the leaves in color order to determine how you want to arrange them for the wreath.

Create your wreath frame by circling the Kraft-covered wire to your desired size. Secure with floral tape.

Place one leaf over the floral tape on the frame and wrap the wire around the frame to secure. Place the next leaf overlapping the first, but slightly below. Wrap the wire around the frame.

Tip from Pink and Posey: To save time, wrap a wire a few times around the frame, then wrap a few more times with the next wire, and on and on. You can also place two leaves at the same time and wrap together. Keep an eye on spacing so that your leaves are evenly spaced around the entire wreath.

Once you have all leaves secured to the frame, trim off any excess wire and fluff the leaves.

We love how this bright tie-dye rainbow wreath turned out, don’t you? What other tie-dye projects for the home are you crafting up this summer? Tag us on social @tulipcolorcrafts and share with us!